Installing R and RStudio
An illustrated guide to setting up R and RStudio on Windows, macOS, and Linux.
Learning Goal
At the end of this guide, you should have a working R installation with RStudio available as a more convenient interface to work with R.
To achieve that, we are going to do two things:
- Install R, the programming language.
This allows you to execute R code and run R scripts. - Install RStudio, an Integrated Development Environment (IDE) for R.
This provides a user-friendly interface to write and run R code.
It is not strictly necessary to work with R, but it is highly recommended for everyone who does not already have a strong preference in this regard1.
If you just want the quick version of what to do, here is a short version of the guide:
Installing R
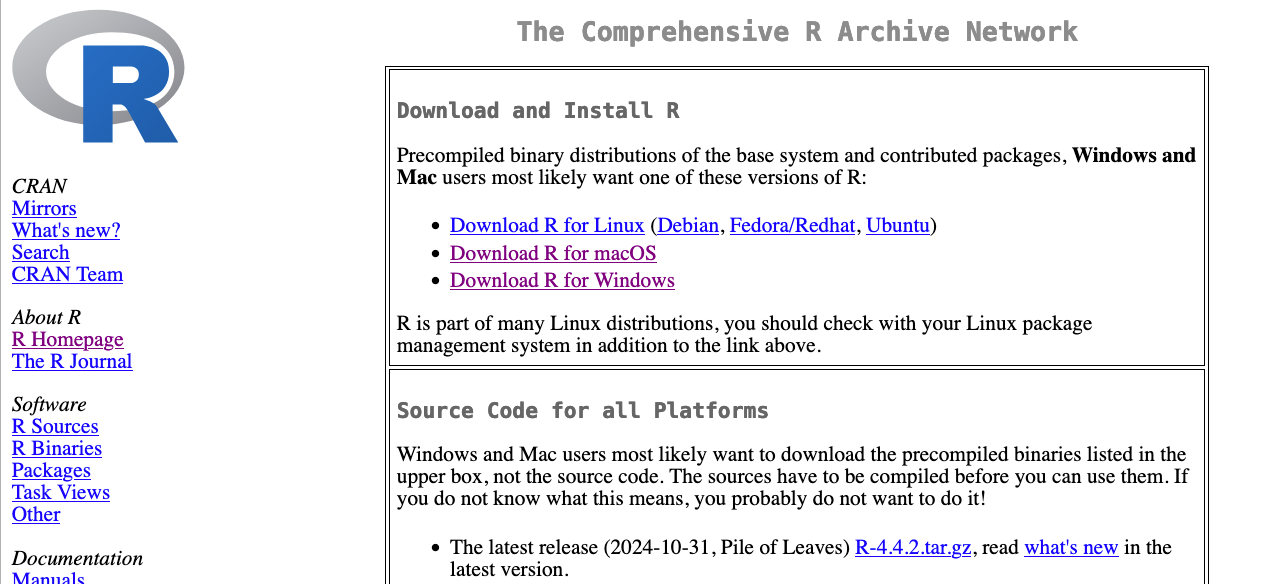
To install R, you need to download the installer from CRAN, the Comprehensive R Archive Network. This is the official repository for R packages and R itself. The website itself may look a little dated, which is mostly due to it being, in fact, a little dated.
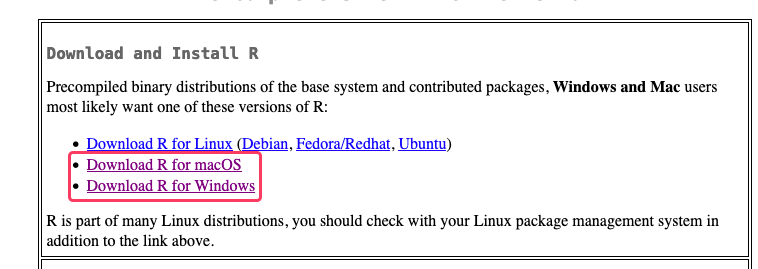
Here you find direct links to download R for Windows, macOS and Linux — but please note that for Linux, I provide alternative instructions below that do not make use of CRAN.
If you are on Windows or macOS, proceed to the appropriate option here. Please note that I have extensive experience on macOS and various Linux distributions, but I do not have any recent experience with Windows. If you find these instructions lacking, please refer to the video guides I linked below for additional resources.
Now, click on the tab for your operating system for the next steps.
You will be presented with multiple links, but the relevant one is the base version of R, which includes the core components.
Click on it and you will be greeted with this page:
Here, click the highlighted link to download the installer.
Run the installer on your PC and follow the instructions. You may be asked to accept the usual licenses of course, and can accept nay other defaults.
Optional: RTools
While you are here, you might as well also install RTools.
You may not need this at first, but at some point in the future you may be asked to install an in-development R package from a different source than CRAN such as GitHub. In these cases it may be necessary to compile the package from source, requiring additional compilers and tools — this is what RTools provides.
Navigate back to the overview site where you found base R and look for the link to RTools.
Click on the link to RTools 4.4 (or whichever is the most recent version) and download the installer.
Run the installer and you should be good to go!
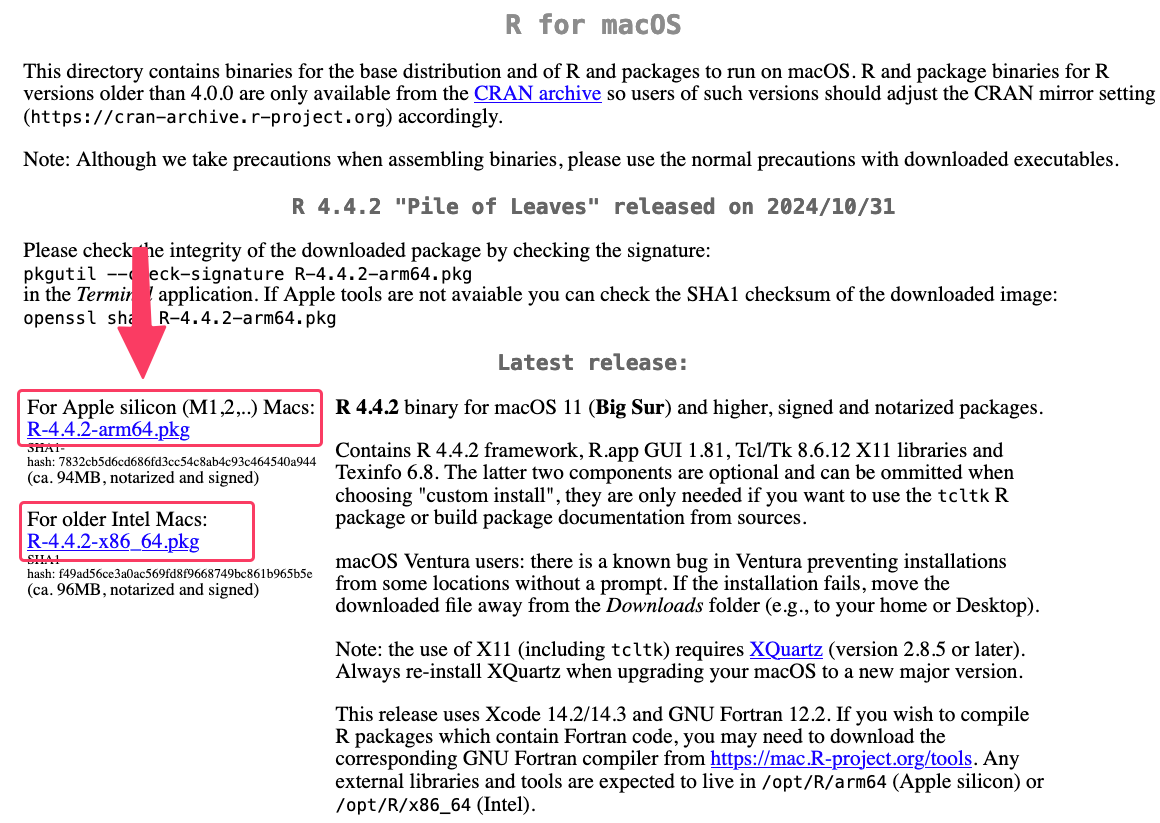
The download page for macOS is quite simple: For reasonably modern systems, you can just click the top link to download the latest version of R for macOS.
Click on the top link to download the latest version of R for macOS on recent Apple computers. For older systems (pre 2020’s Apple Silicon), you may need to use second link for Intel Macs.
If you are unsure which version is correct for you, you should find some system information in the About this Mac section of your computer via the Settings app. Any reference to an “Apple M1” (or M2, …) chip means you have a recent Apple Silicon Mac.
For even older systems you may need to scroll down further for “Binaries for legacy macOS/OS X systems”, but I do not have experience with installing R on legacy systems unfortunately.
In any case, you will have downloaded a .pkg file, which you can run by double-clicking it and following the instructions, accepting any defaults that may come up.
Rather than installing R from CRAN, I have made very good experience with a tool called rig and basically always use it on any platform I can.
You can install it on many Linux platforms, including Ubuntu, by following the instructions provided in its documentation. Due to the myriad of Linux distributions, I cannot provide a one-size-fits-all solution here, but the instructions on the rig page should be sufficient, assuming you know how to enter commands in a terminal.
After installing it, you can install R by running the following command in your terminal:
rig add releaseAfterwards, running R in your terminal should start R.
That’s it!
Whichever path you chose, you should now have R installed on your system! Note that this is only the so-called “base R” distribution, which means that it contains the core parts of the language. However, there is an extensive package ecosystem that you can install on top of this, extending the functionality of R in many ways. We will install one collection of packages after the next section.
Installing RStudio
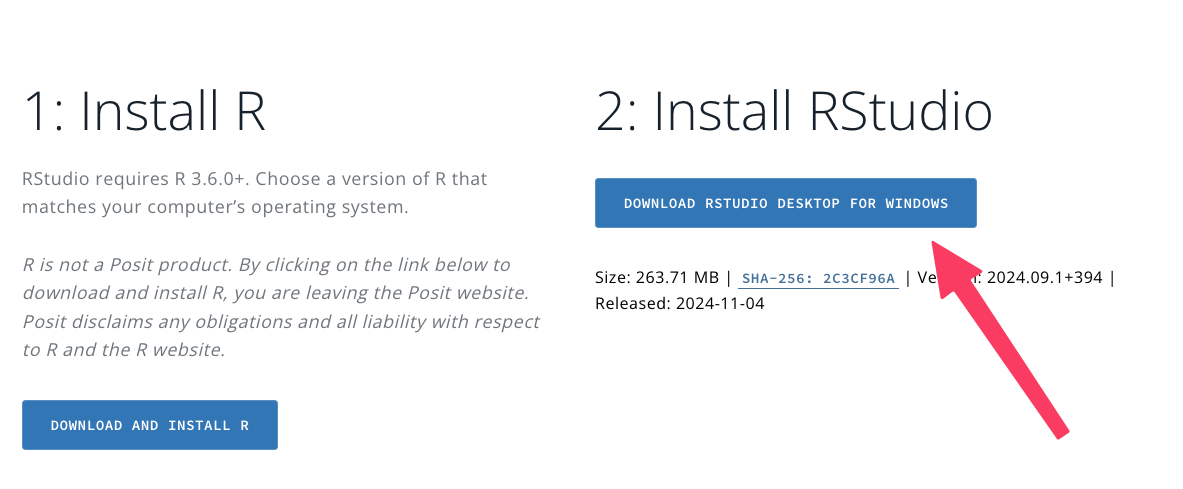
We move on to install RStudio, the IDE for R. We get it from the Posit website, where you will find a download link for RStudio Desktop. Posit is the public benefit company formally known as RStudio, so you might run into references to both “RStudio the company” and “RStudio the IDE” on the internet. These days it is the company Posit, publishing the open-source IDE RStudio.
You will find two large buttons, one for installing R — which you presumably already did! If not, please scroll up on this site.
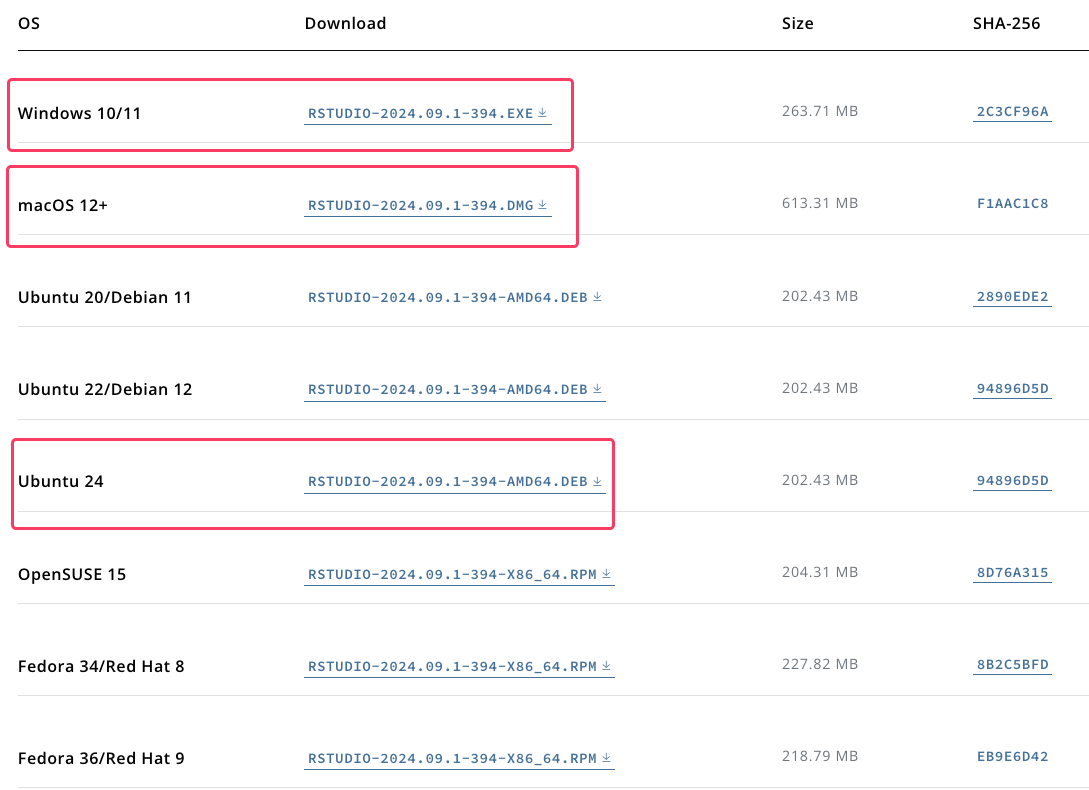
The second link hopefully links to the download for RStudio on your system, but if not, you can find the appropriate link in the list below.
Scrolling further down, you find download links for Windows, macOS, various versions of Ubuntu, and less common Linux distributions. If the big link above does not match your platform, you will hopefully find the correct version here.
Click on the appropriate link for your system to download the installer, and run it just like you did the R installer before or however else you typically install software.
Checking the Installation
After installing R and RStudio, you can check if everything is working by opening RStudio. Depending on your platform you might either find a desktop shortcut showing the RStudio logo or you can find it in your applications menu.
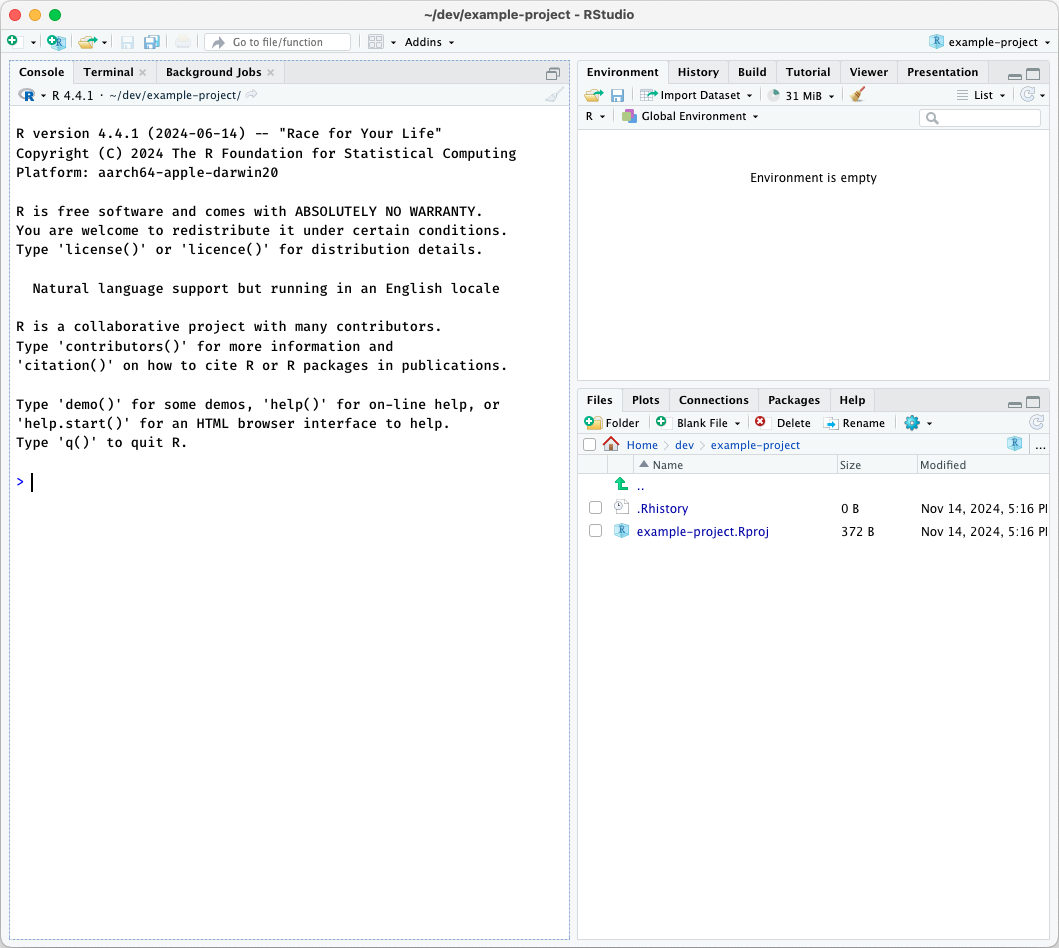
When you open RStudio, you should see a window similar to the one below.
The left half constitutes the console view, where you can type and execute R code directly. We will now try installing the tidyverse, a collection of packages that are very useful for data analysis and visualization. The tidyverse package itself is a collection of multiple other packages, each in turn providing different functionality.
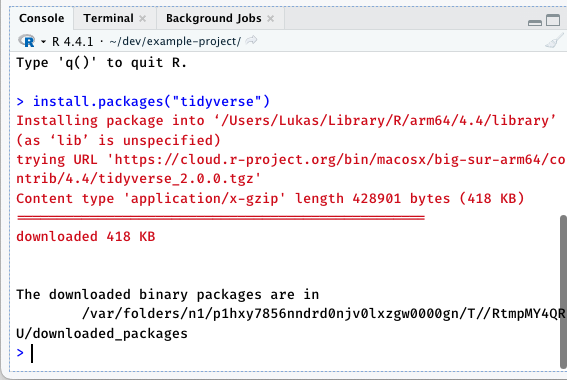
Type
install.packages("tidyverse")and press EnterEnter You should see some activity in the console, and after a while you should see a message that the package was installed successfully. The text may be red, but that does not necessarily imply there was an error!
Finally, type
library("tidyverse")and press EnterEnter again. If you do not see any error messages, you have successfully installed R and RStudio, and even set up the tidyverse already!
In R, packages have to be installed once using install.packages("package-name"), and then loaded in each new session with library(package-name). In library(), you can omit the "quotes", but in install.packages() they are necessary. This is weird and confusing, yes!
Video Guides
If you prefer a video guide, many are available on YouTube.
Here are a few examples:
Click to expand embedded YouTube videos
Windows 10
Windows 11
macOS
Ubuntu (should also apply for e.g. Linux Mint)
Footnotes
If you already have a strong preference for an IDE, there are many other options including emacs, NeoVim and Visual Studio Code. Or the still in development Positron if you feel adventurous.↩︎


![RStudo Desktop description reading 'Used by millions of people weekly, the RStudio integrated development environment (IDE) is a set of tools built to help you be more productive with R and Python. [...]'](img/rstudio-header.png)
